Deep Residual Learning for Image Recognition

机构:微软
(上篇文章代码部分有误,已删除,本文为修改版)
Step1:背景
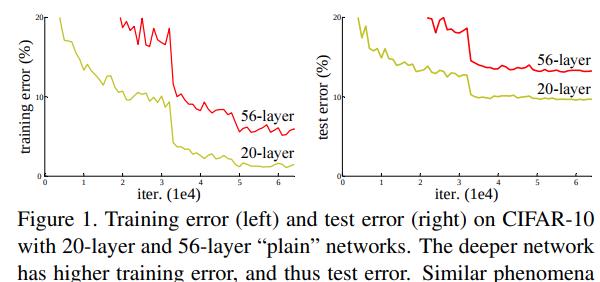
ResNet(2015年)诞生于VGG网络(2014年)之后,随着VGG这样通过简单堆叠的神经网络层数的加深可能会出现梯度消失或梯度爆炸的现象,如图1所示,为了保持反向传播的梯度相关性,ResNet团队提出了残差结构,如图2所示。

梯度的相关性实际上是随着层数增加持续衰减的。而经过证明,ResNet可以有效减少这种相关性的衰减。
对于L层的网络来说,没有残差表示的Plain Net(如VGG16)梯度相关性的衰减在1/(2^L),而ResNet的衰减却只有1/[L^(1/2)]。
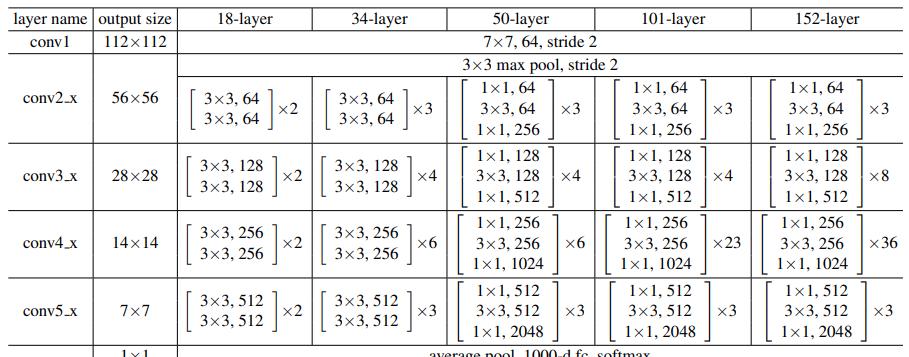
ResNet家族结构:
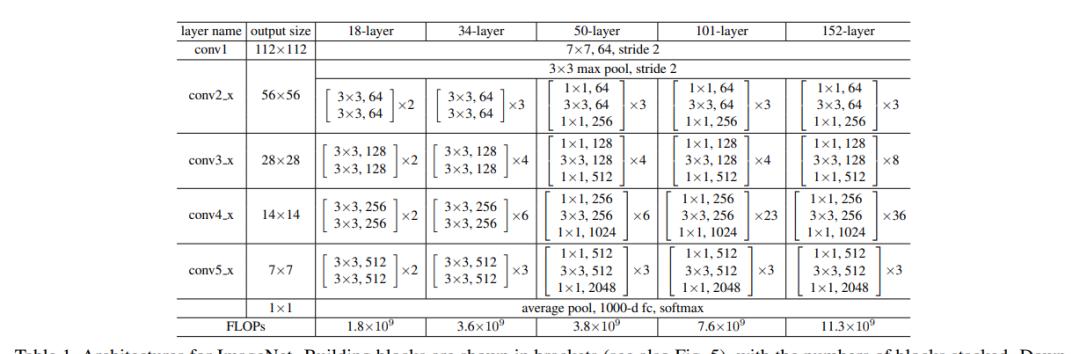
代码复现时留意虚线残差结构部分:
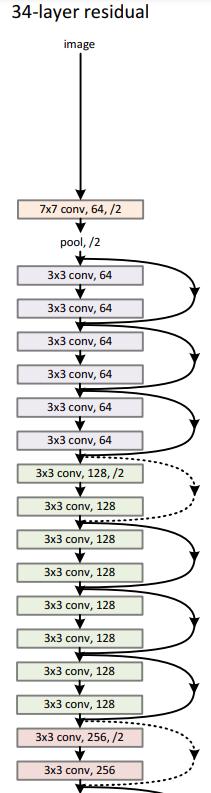
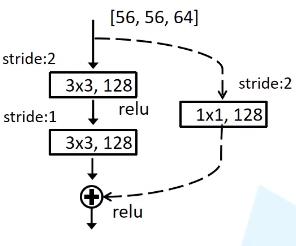
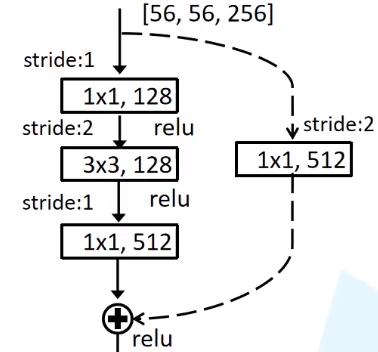
虚线残差结构:
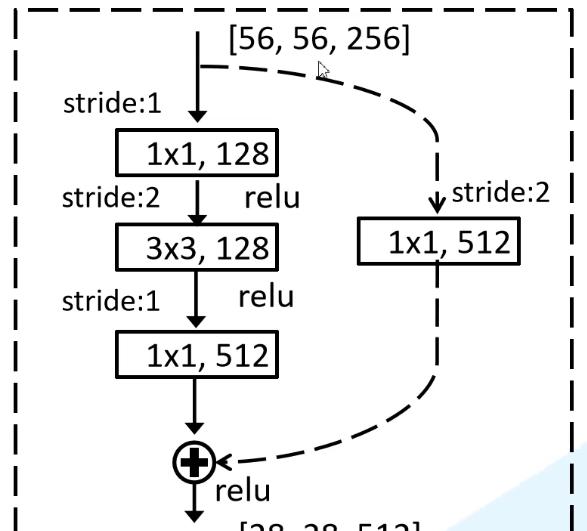
左图为resnet34残差结构,右图为resnet50及以上残差结构:

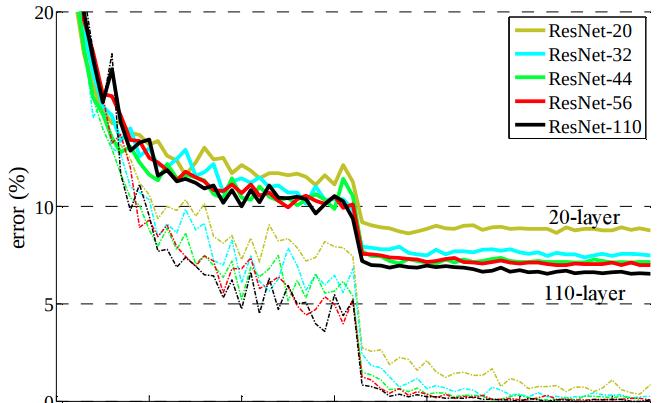
含有shortcut的残差结构可以解决在深度增加时的网络退化问题。由图可见,使用了残差结构后,resnet-110的错误率低于其他较浅网络:
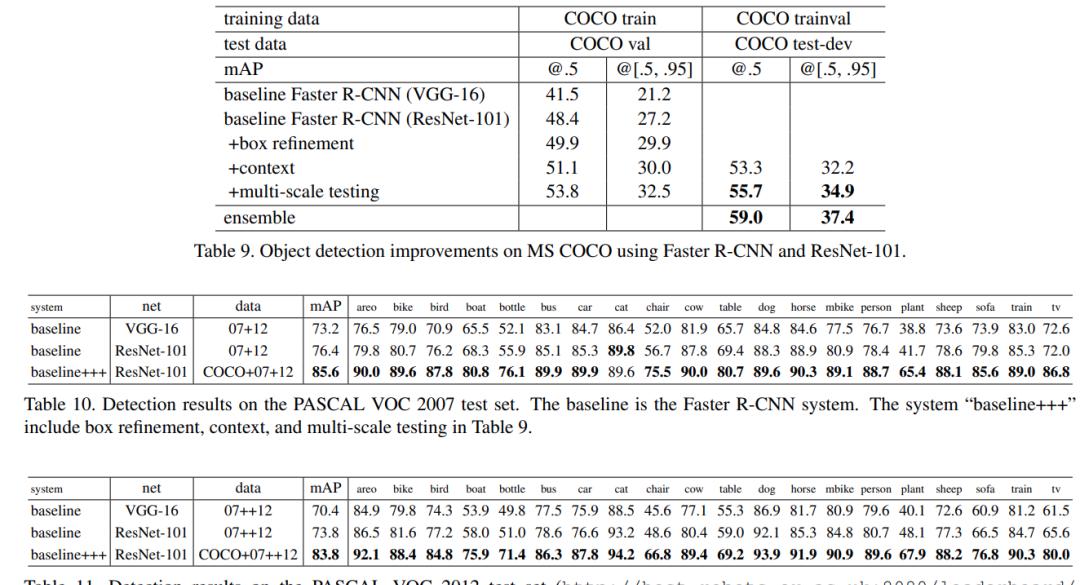
与VGG16性能对比(mAP全方位提升):
BN层(batch normalization):
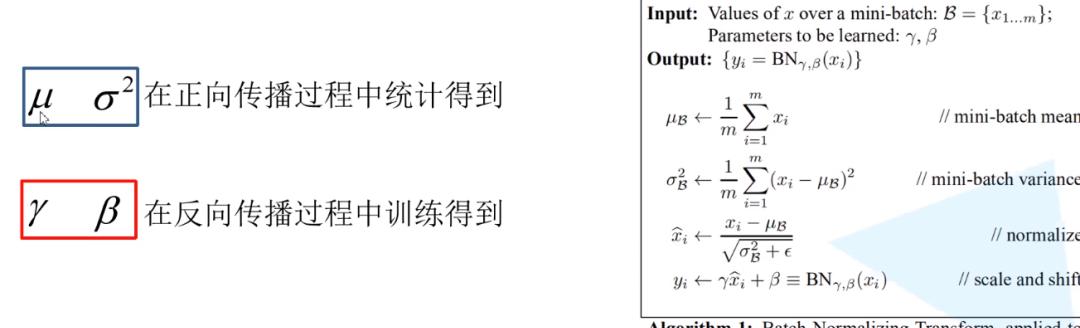
谷歌于2015年提出,通过此方法能加速网络收敛,并提升准确率。
目的:为了使一个batch中的featuremap每一层满足均值为0,方差为1的分布(或符合某一规律的其他分布)。
具体计算方法(如均值):将一批图片中计算得到的多个feature maps的同一channel取平均,即得到均值。
BN层使用注意事项:
1. batch尽可能大,以接近训练集整体均值和方差。
2. 卷积层不需要使用bias,bias无效。
3. 将BN层置于卷积层和激活层(如ReLu)之间。
Step2:代码详解
使用Pytorch,并根据结构图搭建网络:
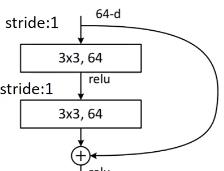
BasicBlock(resnet-18/34):
普通残差结构:
虚线残差结构(conv3_x, conv4_x, conv5_x开头的block结构):
class BasicBlock(nn.Module): expansion = 1 # in channels * expansion = out channels def __init__(self, in_channel, out_channel, stride=1, downsample=None): super(BasicBlock, self).__init__() self.conv1 = nn.Conv2d(in_channels=in_channel, out_channels=out_channel, kernel_size=(3, 3), stride=(stride, stride), padding=1, bias=False) self.conv2 = nn.Conv2d(in_channels=out_channel, out_channels=out_channel, kernel_size=(3, 3), stride=(1, 1), padding=1, bias=False) self.bn = nn.BatchNorm2d(out_channel) self.relu = nn.ReLU(True) self.downsample = downsample # makes (x, y, channels) –> (x/2, y/2, channels * 2) def forward(self, x): identity = x if self.downsample is not None: identity = self.downsample(x) out = self.conv1(x) out = self.bn(out) out = self.relu(out) out = self.conv2(out) out = self.bn(out) out = identity out = self.relu(out)returnout
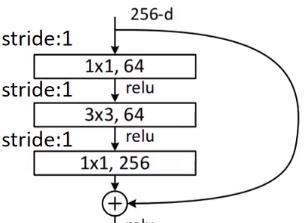
Bottleneck(resnet-50 and more):
普通残差结构:
虚线残差结构:
class Bottleneck(nn.Module): expansion = 4 def __init__(self, in_channel, out_channel, stride=1, downsample=None): super(Bottleneck, self).__init__() self.conv1 = nn.Conv2d(in_channels=in_channel, out_channels=out_channel, kernel_size=(1, 1), stride=(1, 1), bias=False) self.bn1 = nn.BatchNorm2d(out_channel) # ——————————————————————————————- self.conv2 = nn.Conv2d(in_channels=out_channel, out_channels=out_channel, kernel_size=(3, 3), stride=(stride, stride), padding=1, bias=False) self.bn2 = nn.BatchNorm2d(out_channel) # ——————————————————————————————- self.conv3 = nn.Conv2d(in_channels=out_channel, out_channels=self.expansion * out_channel, kernel_size=(1, 1), stride=(1, 1), bias=False) self.bn3 = nn.BatchNorm2d(out_channel * self.expansion) self.relu = nn.ReLU(inplace=True) self.downsample = downsample def forward(self, x): identity = x if self.downsample is not None: identity = self.downsample(x) out = self.conv1(x) out = self.bn1(out) out = self.relu(out) out = self.conv2(out) out = self.bn2(out) out = self.relu(out) out = self.conv3(out) out = self.bn3(out) out = identity out = self.relu(out) return out
总体框架(自顶向下构造):
(tips:卷积核的padding一般都是根据shape的需要,最后才计算得到的)
class ResNet(nn.Module): “”” We should consider two situations: resnet18/34 and resnet50/more. “”” def __init__(self, block, block_nums: list, num_classes: int = 1000, include_top=True): super(ResNet, self).__init__() self.include_top = include_top # ——— create bottom convolution_1 ———– self.conv1 = nn.Conv2d(in_channels=3, out_channels=64, kernel_size=(7, 7), stride=(2, 2), padding=3, bias=False) self.bn1 = nn.BatchNorm2d(64) self.relu = nn.ReLU(True) self.maxpool = nn.MaxPool2d(kernel_size=(3, 3), stride=(2, 2), padding=1) # ————————————————- self.in_channel = 64 # ————- create the rest conv ————– self.layer1 = self._make_layer(block, 64, block_nums[0]) self.layer2 = self._make_layer(block, 128, block_nums[1], stride=2) self.layer3 = self._make_layer(block, 256, block_nums[2], stride=2) self.layer4 = self._make_layer(block, 512, block_nums[3], stride=2) if self.include_top: self.avgpool = nn.AdaptiveAvgPool2d((1, 1)) self.fc = nn.Linear(block.expansion * 512, num_classes) # resnet18/34 = 512 but resnet50 = 512*4 # ————————————————- for m in self.modules(): if isinstance(m, nn.Conv2d): nn.init.kaiming_normal_(m.weight, mode=’fan_out’, nonlinearity=’relu’) # make conv2_x or conv3_x or conv4_x or conv5_x def _make_layer(self, block, channel, block_num, stride=1): downsample = None # ———- define the dotted line block ———— if stride != 1 or self.in_channel != channel * block.expansion: # see the construct picture in the paper downsample = nn.Sequential( nn.Conv2d(self.in_channel, channel * block.expansion, kernel_size=(1, 1), stride=(stride, stride), bias=False), nn.BatchNorm2d(channel * block.expansion)) # ————————————————— layers = [block(self.in_channel, channel, downsample=downsample, stride=stride)] self.in_channel = channel * block.expansion # update the ‘self.in_channel’ for _ in range(1, block_num): layers.append(block(self.in_channel, channel)) return nn.Sequential(*layers) def forward(self, x): x = self.conv1(x) x = self.bn1(x) x = self.relu(x) x = self.maxpool(x) x = self.layer1(x) x = self.layer2(x) x = self.layer3(x) x = self.layer4(x) if self.include_top: x = self.avgpool(x) x = torch.flatten(x, 1) x = self.fc(x)returnx
构造方法:
def resnet50(num_classes=1000, include_top=True): return ResNet(Bottleneck, [3, 4, 6, 3], num_classes=num_classes, include_top=include_top)if __name__ == ‘__main__’: my_resnet50 = resnet50() print(my_resnet50)
花分类模型训练过程:
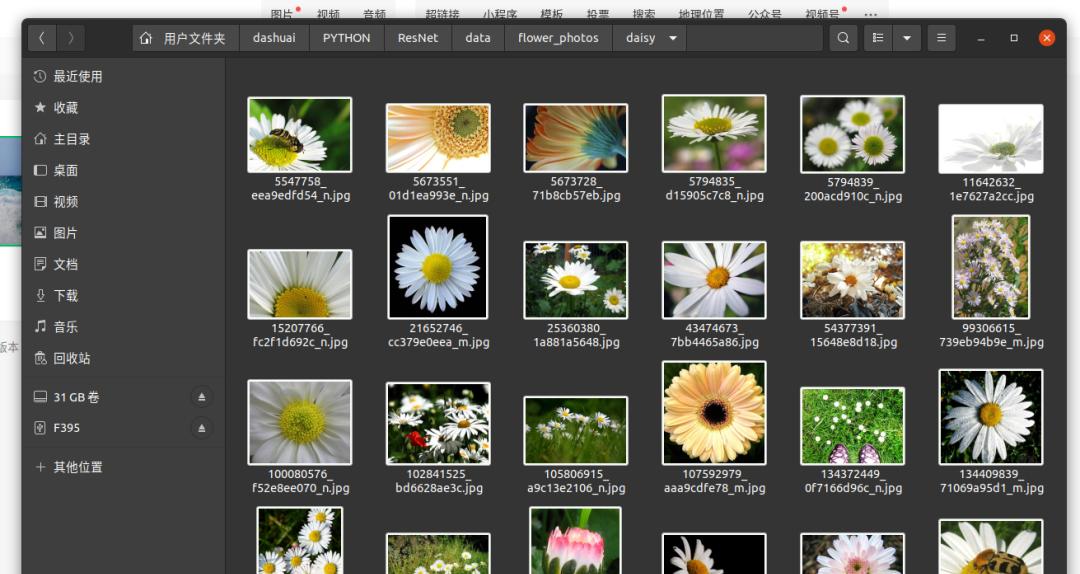
数据集:共3000多张,分为5类花朵图片,如向日葵,玫瑰等:

迭代训练100轮epoch后分类精度超过了80%,通过曲率可以观察到模型仍有提升空间,并且参数量比VGG16少了5倍(VGG16保存的权重文件有500多Mb,而ResNet只要90多Mb)。