导语 |随着业务的发展,业务数据不停的增长,原有的磁盘空间可能会出现磁盘空间不够用的情况,因此,需要对磁盘空间进行扩容,以满足业务数据增长的需求。本文总结了Linux环境下云服务器存储扩容的三种方式及其操作步骤,与大家一同交流。
环境说明:
Linux操作系统:CentOS Linux release 7.6.1810 (Core)平台环境:腾讯云CVM,CBS
一、存储扩容概述
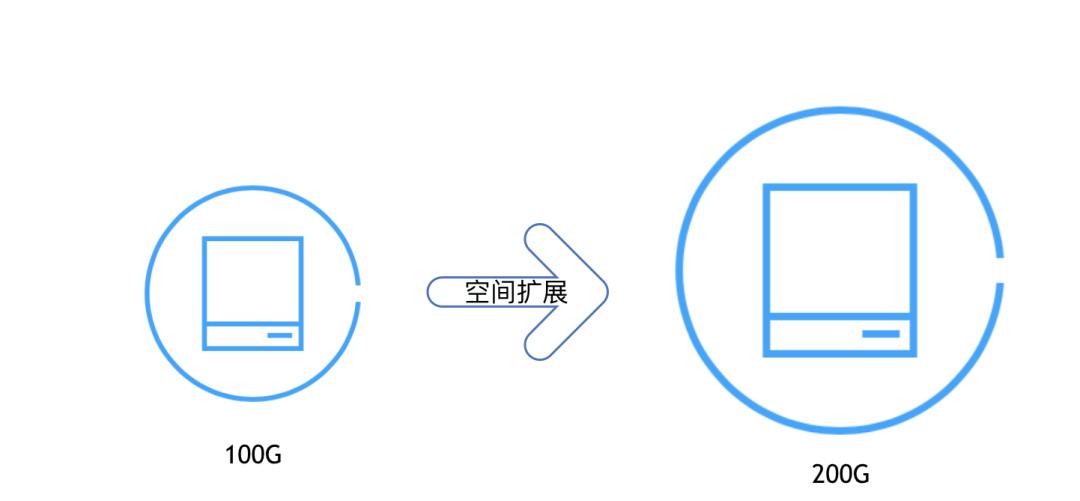
以下图为例,假如起初购买了100G磁盘空间,随着数据的不停增长,原有100G空间不够用了,将空间扩容至200G。CBS是腾讯云提供用于云服务器的持久性数据块级存储服务,云盘具有弹性,按需扩容特性,云盘可以任意的按需扩容。
 存储扩容概述不过云盘扩容时不是所有的场景下都可以任意扩容,云盘扩容具有两个限制:系统盘不支持扩容,理论上系统盘也能够支持扩容,系统盘存放操作系统数据,扩容可能会造成系统启动异常;本地盘不支持扩容,本地盘使用宿主机的本地盘,本地盘弹性扩容能力没有云盘灵活,无法支持弹性按需扩容。要深入掌握云盘的扩容,需要掌握云盘的使用方式,在Linux下通常有如下三种使用方式:
裸设备创建文件系统,不需要创建任何分区,直接在裸盘上创建文件系统;
磁盘上创建MBR格式的分区,适用于小于2T的多个磁盘分区的场景;
磁盘上创建GPT格式的分区,适用于大于2T的多个磁盘分区的场景。
二、 Linux云服务器存储扩容
1. 裸设备磁盘使用Linux系统中可以直接在裸设备磁盘上创建文件系统,即磁盘不需要创建任何磁盘分区,直接在磁盘上创文件文件系统并挂载使用,其具有如下特点:磁盘不需要多个分区;适用于大于2T磁盘;简单易使用;后期支持在线扩容。
 裸设备文件创建文件系统上图所示是在Linux系统中直接在裸设备创建文件系统的操作步骤,先在控制台购买好云盘并将其挂载到CVM中,然后登陆到Linux系统中对磁盘格式化文件系统并挂载使用。控制台购买和挂载请自行操作,如下演示在Linux系统中裸设备文件系统的使用步骤:(1) 登陆操作系统,通过fdisk -l获取磁盘的名称,系统有两块磁盘vda和vdb,/dev/vdb是我们操作的磁盘。[root@VM_0_89_centos ~]# fdisk -lDisk /dev/vda: 53.7 GB, 53687091200 bytes, 104857600 sectors #vda为系统盘Units = sectors of 1 * 512 = 512 bytesSector size (logical/physical): 512 bytes / 512 bytesI/O size (minimum/optimal): 512 bytes / 512 bytesDisk label type: dosDisk identifier: 0x0009ac89 Device Boot Start End Blocks Id System/dev/vda1 * 2048 104857566 52427759 83 LinuxDisk /dev/vdb: 107.4 GB, 107374182400 bytes, 209715200 sectors #vdb为数据盘Units = sectors of 1 * 512 = 512 bytesSector size (logical/physical): 512 bytes / 512 bytesI/O size (minimum/optimal): 512 bytes / 512 bytes(2) 直接在磁盘上创建文件系统(注:并未在磁盘上创建任何分区),根据需要格式化为ext4或xfs格式。[root@VM_0_89_centos ~]# mkfs.ext4 /dev/vdb #创建文件ext4文件系统mke2fs 1.42.9 (28-Dec-2013)Filesystem label=OS type: LinuxBlock size=4096 (log=2)Fragment size=4096 (log=2)Stride=0 blocks, Stripe width=0 blocks6553600 inodes, 26214400 blocks1310720 blocks (5.00%) reserved for the super userFirst data block=0Maximum filesystem blocks=2174746624800 block groups32768 blocks per group, 32768 fragments per group8192 inodes per groupSuperblock backups stored on blocks: 32768, 98304, 163840, 229376, 294912, 819200, 884736, 1605632, 2654208, 4096000, 7962624, 11239424, 20480000, 23887872Allocating group tables: doneWriting inode tables: doneCreating journal (32768 blocks): doneWriting superblocks and filesystem accounting information: done备注:如果要创建为xfs则使用mkfs.xfs /dev/vdb(3) 创建好文件系统后即可挂载到系统中使用,使用方式有两种:临时mount或编写fstab实现持久性挂载。线上环境推荐使用编写fstab的方式,避免机器下次重启后磁盘信息未加载,挂载名称推荐使用UUID。blkid获取磁盘UUID信息[root@VM_0_89_centos ~]# blkid /dev/vdb/dev/vdb: UUID=”7fb2c90a-fcd1-472c-b07c-8a20e2e9a436″ TYPE=”ext4″编写/etc/fstab,其内容如下UUID=”7fb2c90a-fcd1-472c-b07c-8a20e2e9a436″ /data ext4 defaults 0 0(4) 挂载点目录/data需要提前创建好,然后执行mount -a进行加载,mount -a是系统启动时之行的指令,如果fstab编写有误要及时修复,避免影响下次开机启动。执行挂载操作[root@VM_0_89_centos ~]# mount -a检查挂载情况[root@VM_0_89_centos ~]# df -hFilesystem Size Used Avail Use% Mounted ondevtmpfs 485M 0 485M 0% /devtmpfs 496M 24K 496M 1% /dev/shmtmpfs 496M 444K 496M 1% /runtmpfs 496M 0 496M 0% /sys/fs/cgroup/dev/vda1 50G 1.8G 46G 4% /tmpfs 100M 0 100M 0% /run/user/0/dev/vdb 99G 61M 94G 1% /data #vdb磁盘已顺利挂载到系统中,大小为100G至此,基于Linux系统上使用裸盘构建文件系统并使用操作演示完毕,通过操作可知,裸盘上创建文件系统方式不需要对磁盘进行分区,操作便捷容易,且方便扩容,下面部分将演示基于裸设备文件的文件系统存储空间扩容。2. 裸设备磁盘扩容
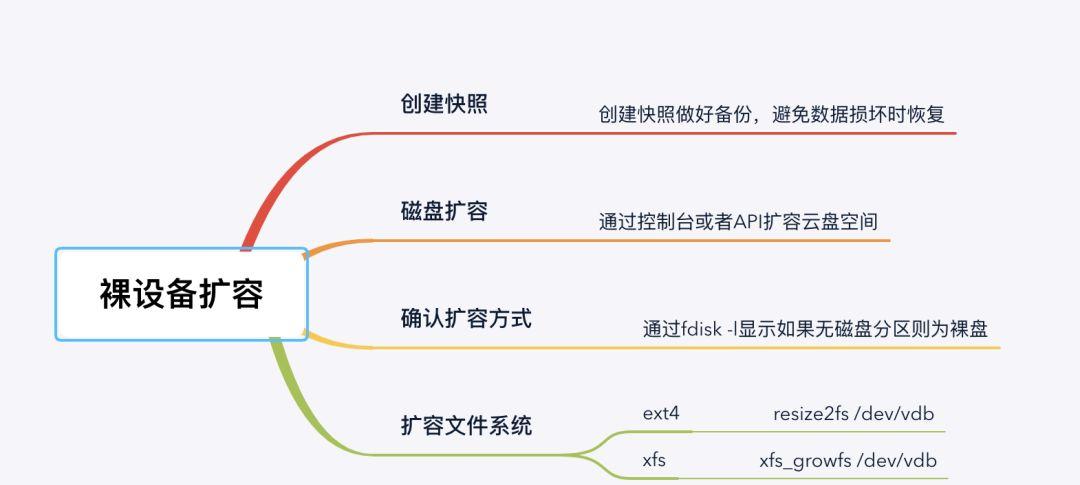 裸设备扩容上述步骤是裸设备磁盘的扩容方式,扩容过程中存在数据损坏的风险,为了避免扩容过程中误操作,强烈建议扩容前对磁盘做快照,以防数据损坏时做恢复!做完快照后在控制台完成磁盘的扩容,扩容完毕后需要在操作系统中识别到扩容的空间。以磁盘扩容至200G为例,演示在Linux中裸设备扩容的操作过程:(1) 确认磁盘的使用方式,通过fdisk -l查看磁盘并未创建有任何磁盘分区。[root@VM_0_89_centos ~]# fdisk -l /dev/vdbDisk /dev/vdb: 214.7 GB, 214748364800 bytes, 419430400 sectors #磁盘空间已扩容至200GUnits = sectors of 1 * 512 = 512 bytesSector size (logical/physical): 512 bytes / 512 bytesI/O size (minimum/optimal): 512 bytes / 512 bytes #当前磁盘上未创建任何分区#使用blkid查看vdb磁盘文件系统的情况,可得知,当前/dev/vdb未创建磁盘分区,切构建了ext4文件系统[root@VM_0_89_centos ~]# blkid/dev/sr0: UUID=”2020-01-13-22-30-05-00″ LABEL=”config-2″ TYPE=”iso9660″ /dev/vda1: UUID=”4b499d76-769a-40a0-93dc-4a31a59add28″ TYPE=”ext4″ /dev/vdb: UUID=”7fb2c90a-fcd1-472c-b07c-8a20e2e9a436″ TYPE=”ext4″ #直接在裸盘上创建ext4文件系统(2) 确认为云盘的扩容方式为裸盘后,根据文件系统的类型,在文件系统层面扩容以识别到云盘的扩容空间。[root@VM_0_89_centos ~]# resize2fs /dev/vdbresize2fs 1.42.9 (28-Dec-2013)Filesystem at /dev/vdb is mounted on /data; on-line resizing requiredold_desc_blocks = 13, new_desc_blocks = 25The filesystem on /dev/vdb is now 52428800 blocks long. #提示已经扩容至52428800个block备注:如果是xfs,则使用xfs_growfs /dev/vdb扩容(3) 校验磁盘空间扩容情况,使用df -H校验,vdb磁盘已在文件系统扩容至200G。[root@VM_0_89_centos ~]# df -hFilesystem Size Used Avail Use% Mounted ondevtmpfs 485M 0 485M 0% /devtmpfs 496M 24K 496M 1% /dev/shmtmpfs 496M 444K 496M 1% /runtmpfs 496M 0 496M 0% /sys/fs/cgroup/dev/vda1 50G 1.8G 46G 4% /tmpfs 100M 0 100M 0% /run/user/0/dev/vdb 197G 60M 188G 1% /data #已扩容至200G通过上述的操作演示可知,裸盘上并未创建任何磁盘分区,因此扩容过程相当便捷,直接在文件系统上扩容即可,使用简单,这也是云上推荐使用方式。3. MBR磁盘分区如果磁盘需要创建多个分区并将分区挂载到不同的目录中使用需要对磁盘进行分区,传统的磁盘分区方式会使用MBR的格式进行分区,MBR分区具有如下特性:适用于小于2T的磁盘,大于2T的空间将无法识别单块磁盘需要创建多个分区的场景MBR最多支持7个分区,即3个主分区 4个扩展分区
 MBR磁盘分区使用如上图是对磁盘制作MBR格式分区的操作步骤,在控制台购买并挂载到CVM云主机后,登录到操作系统中对磁盘进行分区和使用。如下以新购的一块100G磁盘为例演示基于cbs云盘上创建MBR磁盘分区的过程(1) 使用fdisk -l获取到到磁盘的名称,包含两块磁盘vda和vdb,vdb是我们需要操作的cbs云盘。[root@VM_0_89_centos ~]# fdisk -lDisk /dev/vda: 53.7 GB, 53687091200 bytes, 104857600 sectorsUnits = sectors of 1 * 512 = 512 bytesSector size (logical/physical): 512 bytes / 512 bytesI/O size (minimum/optimal): 512 bytes / 512 bytesDisk label type: dosDisk identifier: 0x0009ac89 Device Boot Start End Blocks Id System/dev/vda1 * 2048 104857566 52427759 83 LinuxDisk /dev/vdb: 107.4 GB, 107374182400 bytes, 209715200 sectorsUnits = sectors of 1 * 512 = 512 bytesSector size (logical/physical): 512 bytes / 512 bytesI/O size (minimum/optimal): 512 bytes / 512 bytes(2) 使用fdisk工具对磁盘进行分区,fdisk /dev/vdb进入到fdisk交互式界面,通过交互式完成分区创建。[root@VM_0_89_centos ~]# fdisk /dev/vdbWelcome to fdisk (util-linux 2.23.2).Changes will remain in memory only, until you decide to write them.Be careful before using the write command.Device does not contain a recognized partition tableBuilding a new DOS disklabel with disk identifier 0x5eeb4bc8.Command (m for help): m #输入m可以获取到操作指令的帮助Command action a toggle a bootable flag b edit bsd disklabel c toggle the dos compatibility flag d delete a partition #删除分区 g create a new empty GPT partition table G create an IRIX (SGI) partition table l list known partition types m print this menu #获取帮助 n add a new partition #创建分区 o create a new empty DOS partition table p print the partition table #显示分区情况 q quit without saving changes #退出,不保存 s create a new empty Sun disklabel t change a partition’s system id u change display/entry units v verify the partition table w write table to disk and exit #保存分区设置 x extra functionality (experts only)Command (m for help): n #新建分区,输入n进入到新建分区交互界面Partition type: p primary (0 primary, 0 extended, 4 free) e extendedSelect (default p): p #选择分区类型,p表示主分区,e代表扩展分区Partition number (1-4, default 1): #分区号码First sector (2048-209715199, default 2048): #起始扇区范围Using default value 2048Last sector, sectors or size{K,M,G} (2048-209715199, default 209715199): #结束删除范围Using default value 209715199Partition 1 of type Linux and of size 100 GiB is setCommand (m for help): p #显示分区情况,可以看到已创建一个vdb1的分区Disk /dev/vdb: 107.4 GB, 107374182400 bytes, 209715200 sectorsUnits = sectors of 1 * 512 = 512 bytesSector size (logical/physical): 512 bytes / 512 bytesI/O size (minimum/optimal): 512 bytes / 512 bytesDisk label type: dosDisk identifier: 0x5eeb4bc8 Device Boot Start End Blocks Id System/dev/vdb1 2048 209715199 104856576 83 Linux #磁盘分区的信息Command (m for help): w #报错退出The partition table has been altered!Calling ioctl() to re-read partition table.Syncing disks.(3) 使用partprobe将分区的信息同步给内核,让内核识别到该分区信息。[root@VM_0_89_centos ~]# partprobe /dev/vdb(4) 接下来可以对分区制作文件系统,制作成操作系统能够识别的文件系统,以制作xfs文件系统为例。[root@VM_0_89_centos ~]# mkfs.xfs /dev/vdb1meta-data=/dev/vdb1 isize=512 agcount=4, agsize=6553536 blks = sectsz=512 attr=2, projid32bit=1 = crc=1 finobt=0, sparse=0data = bsize=4096 blocks=26214144, imaxpct=25 = sunit=0 swidth=0 blksnaming =version 2 bsize=4096 ascii-ci=0 ftype=1log =internal log bsize=4096 blocks=12799, version=2 = sectsz=512 sunit=0 blks, lazy-count=1realtime =none extsz=4096 blocks=0, rtextents=0[root@VM_0_89_centos ~]# blkid/dev/sr0: UUID=”2020-01-13-22-30-05-00″ LABEL=”config-2″ TYPE=”iso9660″ /dev/vda1: UUID=”4b499d76-769a-40a0-93dc-4a31a59add28″ TYPE=”ext4″ /dev/vdb1: UUID=”c387af37-56d7-436c-8ceb-0a735e0db5d5″ TYPE=”xfs” #文件系统制作为xfs备注:如果是制作为ext4则使用mkfs.ext4 /dev/vdb1(5) 编写fstab挂载到系统中,确保下次开机后配置生效。[root@VM_0_89_centos ~]# vim/etc/fstabUUID=”c387af37-56d7-436c-8ceb-0a735e0db5d5″ /data xfs defaults 0 0(6) 执行mount -a加载挂载配置,并检查挂载情况。[root@VM_0_89_centos ~]# mount -a[root@VM_0_89_centos ~]# df -hFilesystem Size Used Avail Use% Mounted ondevtmpfs 485M 0 485M 0% /devtmpfs 496M 24K 496M 1% /dev/shmtmpfs 496M 448K 496M 1% /runtmpfs 496M 0 496M 0% /sys/fs/cgroup/dev/vda1 50G 1.9G 46G 4% /tmpfs 100M 0 100M 0% /run/user/0/dev/vdb1 100G 33M 100G 1% /data #磁盘已经挂载到系统中4 MBR磁盘扩容MBR格式的磁盘扩容需要在MBR磁盘分区中扩展空间,并在文件系统中扩展文件系统空间以识别到扩容的空间,腾讯云为此提供了一个专门扩容的脚本devresize.py,脚本要求条件如下:文件系统是 EXT2/EXT3/EXT4/XFS;当前文件系统不能有错误;扩容后的磁盘大小不超过2TB;当前工具仅支持 Python 2 版本,不支持 Python 3 版本。
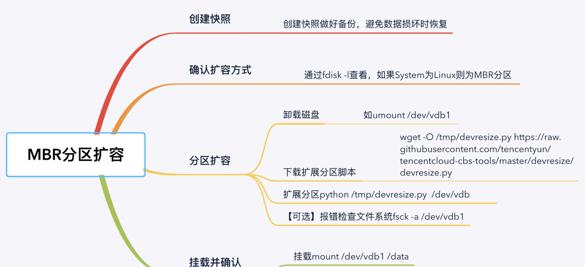 MBR格式磁盘分区扩容如上图为MBR格式磁盘的扩容步骤,现在控制台中做好快照,并扩容,然后登录到操作系统中完成分区和文件系统的扩容,如下以扩容至200G为例演示在MBR格式的磁盘分区扩容方法(1) 检查磁盘的扩容,确认扩容的方式,根据System类型为Linux判断为MBR格式的分区。[root@VM_0_89_centos ~]# fdisk -l /dev/vdbDisk /dev/vdb: 214.7 GB, 214748364800 bytes, 419430400 sectors #空间大小已扩容至200GUnits = sectors of 1 * 512 = 512 bytesSector size (logical/physical): 512 bytes / 512 bytesI/O size (minimum/optimal): 512 bytes / 512 bytesDisk label type: dosDisk identifier: 0x5eeb4bc8 Device Boot Start End Blocks Id System #System类型为Linux表示使用MBR格式分区/dev/vdb1 2048 209715199 104856576 83 Linux(2) 获取扩容的脚本,该脚本可以完成分区的扩容和文件系统的自动扩容,需要离线执行,因此先需要卸载磁盘。[root@VM_0_89_centos ~]# wget -O /tmp/devresize.py https://raw.githubusercontent.com/tencentyun/tencentcloud-cbs-tools/master/devresize/devresize.py无法在线执行,需卸载磁盘[root@VM_0_89_centos ~]# python /tmp/devresize.py /dev/vdb[ERROR] – Target partition /dev/vdb1 must be unmounted.[root@VM_0_89_centos ~]# umount /dev/vdb1(3) 执行扩容步骤。[root@VM_0_89_centos ~]# python /tmp/devresize.py /dev/vdb[INFO] – checking filesystem healthyPhase 1 – find and verify superblock…Phase 2 – using internal log – zero log… – scan filesystem freespace and inode maps… – found root inode chunkPhase 3 – for each AG… – scan and clear agi unlinked lists… – process known inodes and perform inode discovery… – agno = 0 – agno = 1 – agno = 2 – agno = 3 – process newly discovered inodes…Phase 4 – check for duplicate blocks… – setting up duplicate extent list… – check for inodes claiming duplicate blocks… – agno = 0 – agno = 1 – agno = 2 – agno = 3Phase 5 – rebuild AG headers and trees… – reset superblock…Phase 6 – check inode connectivity… – resetting contents of realtime bitmap and summary inodes – traversing filesystem … – traversal finished … – moving disconnected inodes to lost found …Phase 7 – verify and correct link counts…done[INFO] – mount /dev/vdb1 /tmp/mount_point_vdb_2020-01-14_16:04:30[INFO] – umount /dev/vdb1This operation will extend /dev/vdb1 to the last sector of device. To ensure the security of your valuable data, please create a snapshot of this volume before resize its file system, continue? [Y/n]y #提示是否创建快照,确保做好快照后输入y继续It will resize (/dev/vdb1).This operation may take from several minutes to several hours, continue? [Y/n] #备份并resize,确认输入yy[INFO] – Backup MBR to /tmp/MBR_vdb1_2020-01-14_16:04:40_bak[INFO] – mount /dev/vdb1 /tmp/mount_point_vdb_2020-01-14_16:04:30[INFO] – resize filesystemmeta-data=/dev/vdb1 isize=512 agcount=4, agsize=6553536 blks = sectsz=512 attr=2, projid32bit=1 = crc=1 finobt=0 spinodes=0data = bsize=4096 blocks=26214144, imaxpct=25 = sunit=0 swidth=0 blksnaming =version 2 bsize=4096 ascii-ci=0 ftype=1log =internal bsize=4096 blocks=12799, version=2 = sectsz=512 sunit=0 blks, lazy-count=1realtime =none extsz=4096 blocks=0, rtextents=0data blocks changed from 26214144 to 52428544[INFO] – umount /dev/vdb1[INFO] – Finished(4) 重新挂载文件系统并确认扩容空间。[root@VM_0_89_centos ~]# mount -a #重新挂载[root@VM_0_89_centos ~]# df -hFilesystem Size Used Avail Use% Mounted ondevtmpfs 485M 0 485M 0% /devtmpfs 496M 24K 496M 1% /dev/shmtmpfs 496M 448K 496M 1% /runtmpfs 496M 0 496M 0% /sys/fs/cgroup/dev/vda1 50G 1.9G 46G 4% /tmpfs 100M 0 100M 0% /run/user/0/dev/vdb1 200G 33M 200G 1% /data #空间已扩容至200G注意事项:扩容前一定要先做好快照,避免数据损坏时可快速恢复;MBR格式磁盘扩容需要卸载云盘,因此是离线扩容,如果云盘有在使用,请先停止业务后再扩容。5. MBR新增磁盘分区如果需要分区的场景,可以将扩容的空间划分成一个新的分区供操作系统使用,通过在磁盘上新创建分区的方式实现扩容,其具有如下特点:单盘需要多个分区的场景;扩容空间小于2T;扩容后原分区无法扩容;CBS云盘是按需弹性扩展,推荐使用单磁盘单分区挂载,云上推荐使用裸盘创建文件系统。
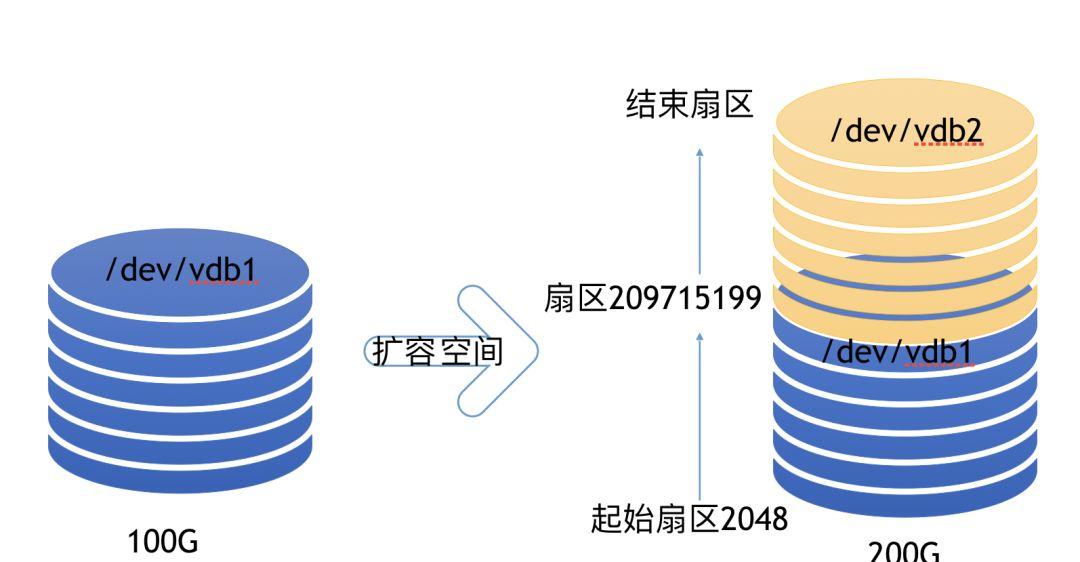 MBR新增磁盘分区如下以一块200G的CBS盘扩容至300G为例演示在MBR格式磁盘上新增分区的方式实现磁盘扩容使用方式:(1) 准备工作,控制台做好快照,并在控制台完成磁盘空间扩容;(2) fdisk -l检查磁盘扩容的大小,通过System类型为Linux可得知其为MBR分区格式的磁盘。[root@VM_0_89_centos ~]# fdisk -l /dev/vdbDisk /dev/vdb: 322.1 GB, 322122547200 bytes, 629145600 sectors #磁盘大小已扩容至300GUnits = sectors of 1 * 512 = 512 bytesSector size (logical/physical): 512 bytes / 512 bytesI/O size (minimum/optimal): 512 bytes / 512 bytesDisk label type: dosDisk identifier: 0x5eeb4bc8 Device Boot Start End Blocks Id System #磁盘分区类型为MBR格式/dev/vdb1 2048 419430399 209714176 83 Linux(3) 扩容磁盘上新创建一个磁盘分区 /dev/vdb2,大小为100G。[root@VM_0_89_centos ~]# fdisk /dev/vdbWelcome to fdisk (util-linux 2.23.2).Changes will remain in memory only, until you decide to write them.Be careful before using the write command.Command (m for help): pDisk /dev/vdb: 322.1 GB, 322122547200 bytes, 629145600 sectorsUnits = sectors of 1 * 512 = 512 bytesSector size (logical/physical): 512 bytes / 512 bytesI/O size (minimum/optimal): 512 bytes / 512 bytesDisk label type: dosDisk identifier: 0x5eeb4bc8 Device Boot Start End Blocks Id System/dev/vdb1 2048 419430399 209714176 83 Linux #当前已有一个分区Command (m for help): n #新增一个分区Partition type: p primary (1 primary, 0 extended, 3 free) e extendedSelect (default p): p #分区类型为主分区Partition number (2-4, default 2): First sector (419430400-629145599, default 419430400): #开始扇区大小Using default value 419430400Last sector, sectors or size{K,M,G} (419430400-629145599, default 629145599): #结束扇区大小Using default value 629145599Partition 2 of type Linux and of size 100 GiB is setCommand (m for help): p #查看分区创建的情况Disk /dev/vdb: 322.1 GB, 322122547200 bytes, 629145600 sectorsUnits = sectors of 1 * 512 = 512 bytesSector size (logical/physical): 512 bytes / 512 bytesI/O size (minimum/optimal): 512 bytes / 512 bytesDisk label type: dosDisk identifier: 0x5eeb4bc8 Device Boot Start End Blocks Id System/dev/vdb1 2048 419430399 209714176 83 Linux/dev/vdb2 419430400 629145599 104857600 83 Linux #分区已创建成功Command (m for help): wThe partition table has been altered!Calling ioctl() to re-read partition table.WARNING: Re-reading the partition table failed with error 16: Device or resource busy.The kernel still uses the old table. The new table will be used atthe next reboot or after you run partprobe(8) or kpartx(8)Syncing disks.(4) 刷新内核分区以识别到分区内容。[root@VM_0_89_centos ~]# partprobe /dev/vdb(5) 格式化磁盘分区,创建操作系统能识别的文件系统,以xfs为例。[root@VM_0_89_centos ~]# mkfs.xfs /dev/vdb2meta-data=/dev/vdb2 isize=512 agcount=4, agsize=6553600 blks = sectsz=512 attr=2, projid32bit=1 = crc=1 finobt=0, sparse=0data = bsize=4096 blocks=26214400, imaxpct=25 = sunit=0 swidth=0 blksnaming =version 2 bsize=4096 ascii-ci=0 ftype=1log =internal log bsize=4096 blocks=12800, version=2 = sectsz=512 sunit=0 blks, lazy-count=1realtime =none extsz=4096 blocks=0, rtextents=0(6) 挂载至系统中,推荐使用fstab挂载。获取分区UUID号[root@VM_0_89_centos ~]# blkid /dev/vdb2/dev/vdb2: UUID=”448467bd-f3fa-41cc-a5ad-ab316f7b62e2″ TYPE=”xfs”编写fstab文件echo ‘UUID=”448467bd-f3fa-41cc-a5ad-ab316f7b62e2″ /data1 xfs defaults 0 0’ >>/etc/fstab创建挂载目录并挂载[root@VM_0_89_centos ~]# mkdir /data1[root@VM_0_89_centos ~]# mount -a检查挂载情况[root@VM_0_89_centos ~]# df -hFilesystem Size Used Avail Use% Mounted ondevtmpfs 485M 0 485M 0% /devtmpfs 496M 24K 496M 1% /dev/shmtmpfs 496M 452K 496M 1% /runtmpfs 496M 0 496M 0% /sys/fs/cgroup/dev/vda1 50G 1.9G 46G 4% /tmpfs 100M 0 100M 0% /run/user/0/dev/vdb1 200G 33M 200G 1% /data/dev/vdb2 100G 33M 100G 1% /data1 #磁盘分区已经挂载至操作系统至此云盘上使用MBR格式新增分区的演示使用完毕,这种方式适用于单块磁盘多分区的场景。由于云上的磁盘可以根据按需扩容,且采用分区扩容的方式原有分区(第一个分区)将无法扩容,云上推荐使用裸盘方式。6. GPT磁盘分区前文介绍了对磁盘创建MBR格式磁盘分区的使用方式,对于大于2T的磁盘,需要使用GPT格式的方式进行分区,下文将介绍磁盘使用GPT格式进行分区的使用方式。
 GPT磁盘分区先在控制台购买云盘并挂载到云主机中,然后再操作系统中对磁盘进行GPT格式分区并创建文件系统。以创建一个2T磁盘为例,演示Linux中使用parted对磁盘创建GPT格式分区使用过程。(1) 登录操作系统检查磁盘的名称和空间大小。[root@VM_0_89_centos ~]# fdisk -lDisk /dev/vda: 53.7 GB, 53687091200 bytes, 104857600 sectorsUnits = sectors of 1 * 512 = 512 bytesSector size (logical/physical): 512 bytes / 512 bytesI/O size (minimum/optimal): 512 bytes / 512 bytesDisk label type: dosDisk identifier: 0x0009ac89 Device Boot Start End Blocks Id System/dev/vda1 * 2048 104857566 52427759 83 LinuxDisk /dev/vdb: 2147.5 GB, 2147483648000 bytes, 4194304000 sectors #磁盘为vdb,大小为2TUnits = sectors of 1 * 512 = 512 bytesSector size (logical/physical): 512 bytes / 512 bytesI/O size (minimum/optimal): 512 bytes / 512 bytes(2) 使用parted对磁盘打标签和磁盘分区。磁盘打上label并查看确认[root@VM_0_89_centos ~]# parted /dev/vdb mklabel gpt[root@VM_0_89_centos ~]# parted /dev/vdb printModel: Virtio Block Device (virtblk)Disk /dev/vdb: 2147GBSector size (logical/physical): 512B/512BPartition Table: gpt #分区表类型为gptDisk Flags: Number Start End Size File system Name Flags对磁盘进行分区[root@VM_0_89_centos ~]# parted /dev/vdb mkpart primary 2048s 100%Information: You may need to update /etc/fstab.查看分区创建情况[root@VM_0_89_centos ~]# parted /dev/vdb printModel: Virtio Block Device (virtblk)Disk /dev/vdb: 2147GBSector size (logical/physical): 512B/512BPartition Table: gptDisk Flags: Number Start End Size File system Name Flags 1 1049kB 2147GB 2147GB primary #创建了一个磁盘分区,范围是2048s到2147GB(3) 磁盘上创建文件系统,以制作xfs文件系统为例。[root@VM_0_89_centos ~]# mkfs.xfs /dev/vdb1meta-data=/dev/vdb1 isize=512 agcount=4, agsize=131071872 blks = sectsz=512 attr=2, projid32bit=1 = crc=1 finobt=0, sparse=0data = bsize=4096 blocks=524287488, imaxpct=5 = sunit=0 swidth=0 blksnaming =version 2 bsize=4096 ascii-ci=0 ftype=1log =internal log bsize=4096 blocks=255999, version=2 = sectsz=512 sunit=0 blks, lazy-count=1realtime =none extsz=4096 blocks=0, rtextents=0(4) 编写fstab挂载到/data目录中。获取分区UUID[root@VM_0_89_centos ~]# blkid /dev/vdb1/dev/vdb1: UUID=”aa6fc333-e702-4daa-ad0b-10efde57a7f0″ TYPE=”xfs” PARTLABEL=”primary” PARTUUID=”7dace14b-3093-495b-9d0c-fc63f3b87fd7″ 编写fstab将磁盘挂载到/data目录中 UUID=”aa6fc333-e702-4daa-ad0b-10efde57a7f0″ /data xfs defaults 0 0(5) 加载挂载配置信息并确认。[root@VM_0_89_centos ~]# mount -a[root@VM_0_89_centos ~]# df -hFilesystem Size Used Avail Use% Mounted ondevtmpfs 485M 0 485M 0% /devtmpfs 496M 24K 496M 1% /dev/shmtmpfs 496M 448K 496M 1% /runtmpfs 496M 0 496M 0% /sys/fs/cgroup/dev/vda1 50G 1.9G 46G 4% /tmpfs 100M 0 100M 0% /run/user/0/dev/vdb1 2.0T 33M 2.0T 1% /data #磁盘当前已经挂载至/data目录7. GPT磁盘分区扩容
 GPT磁盘扩容上图表示的是GPT格式磁盘分区的扩容步骤,需要在控制台中制作快照并完成扩容,然后在GPT分区中识别到扩容空间,文件文件系统识别到空间,如下以2T扩容至3T为例演示扩容过程:(1) 确认磁盘空间和扩容方式为GPT。[root@VM_0_89_centos ~]# fdisk -l /dev/vdbDisk /dev/vdb: 3221.2 GB, 3221225472000 bytes, 6291456000 sectors #磁盘空间大小已扩容至3TUnits = sectors of 1 * 512 = 512 bytesSector size (logical/physical): 512 bytes / 512 bytesI/O size (minimum/optimal): 512 bytes / 512 bytesDisk label type: dosDisk identifier: 0x00000000 Device Boot Start End Blocks Id System #磁盘分区格式为GPT/dev/vdb1 1 4194303999 2097151999 ee GPT(2) 分区扩容需是离线操作,因此需要先卸载磁盘,卸载前请停止业务使用。[root@VM_0_89_centos ~]# umount /data(3) GPT重新分区,需要先删除原有分区,然后再重建分区,删除前使用unit s获取到磁盘柱面的大小,切记,操作前应要做好快照备份,删除分区重建分区有风险。[root@VM_0_89_centos ~]# parted /dev/vdbGNU Parted 3.1Using /dev/vdbWelcome to GNU Parted! Type ‘help’ to view a list of commands.(parted) printError: The backup GPT table is not at the end of the disk, as it should be. This might mean that another operating system believes the disk is smaller. Fix, by moving the backup to the end(and removing the old backup)?Fix/Ignore/Cancel? Fix #磁盘空间有扩容,因此提示有ERR,输入Fix修复Warning: Not all of the space available to /dev/vdb appears to be used, you can fix the GPT to use all of the space (an extra 2097152000 blocks) or continue with the current setting? Fix/Ignore? Fix #空间并未完全使用提示有Waring,输入Fix修复Model: Virtio Block Device (virtblk)Disk /dev/vdb: 3221GBSector size (logical/physical): 512B/512BPartition Table: gptDisk Flags: Number Start End Size File system Name Flags 1 1049kB 2147GB 2147GB xfs primary #当前分区的情况(parted) unit s #使用单元的方式显示大小范围 (parted) printModel: Virtio Block Device (virtblk)Disk /dev/vdb: 6291456000sSector size (logical/physical): 512B/512BPartition Table: gptDisk Flags: Number Start End Size File system Name Flags 1 2048s 4194301951s 4194299904s xfs primary #Start起始范围为2048s,后面重建分区需要使用到(parted) rm 1 #删除分区信息 (parted) printModel: Virtio Block Device (virtblk)Disk /dev/vdb: 6291456000sSector size (logical/physical): 512B/512BPartition Table: gptDisk Flags: Number Start End Size File system Name Flags #确认分区信息已被删除(parted) mkpart primary 2048s 100% #重新创建磁盘分区,起始范围需要和原分区保持一致(parted) printModel: Virtio Block Device (virtblk)Disk /dev/vdb: 6291456000sSector size (logical/physical): 512B/512BPartition Table: gptDisk Flags: Number Start End Size File system Name Flags 1 2048s 6291453951s 6291451904s xfs primary(4) GPT分区扩容完毕后,需要在文件系统中扩容空间,切记,不要格式化文件系统,否则数据将会丢失。根据文件系统类型选择扩容方式,以xfs为例:将磁盘挂载到系统中[root@VM_0_89_centos ~]# mount -a[root@VM_0_89_centos ~]# df -h文件系统 容量 已用 可用 已用% 挂载点devtmpfs 485M 0 485M 0% /devtmpfs 496M 24K 496M 1% /dev/shmtmpfs 496M 488K 495M 1% /runtmpfs 496M 0 496M 0% /sys/fs/cgroup/dev/vda1 50G 1.9G 46G 4% /tmpfs 100M 0 100M 0% /run/user/0/dev/vdb1 2.0T 33M 2.0T 1% /data扩容文件系统空间[root@VM_0_89_centos ~]# xfs_growfs /dev/vdb1meta-data=/dev/vdb1 isize=512 agcount=4, agsize=131071872 blks = sectsz=512 attr=2, projid32bit=1 = crc=1 finobt=0 spinodes=0data = bsize=4096 blocks=524287488, imaxpct=5 = sunit=0 swidth=0 blksnaming =version 2 bsize=4096 ascii-ci=0 ftype=1log =internal bsize=4096 blocks=255999, version=2 = sectsz=512 sunit=0 blks, lazy-count=1realtime =none extsz=4096 blocks=0, rtextents=0data blocks changed from 524287488 to 786431488 #已完成空间扩容校验文件系统空间[root@VM_0_89_centos ~]# df -h文件系统 容量 已用 可用 已用% 挂载点devtmpfs 485M 0 485M 0% /devtmpfs 496M 24K 496M 1% /dev/shmtmpfs 496M 488K 495M 1% /runtmpfs 496M 0 496M 0% /sys/fs/cgroup/dev/vda1 50G 1.9G 46G 4% /tmpfs 100M 0 100M 0% /run/user/0/dev/vdb1 3.0T 33M 3.0T 1% /data #已扩容至3T备注:如果是ext3、ext4则使用resize2fs /dev/vdb1实现文件系统的扩容。至此,基于GPT的磁盘格式磁盘分区扩容完毕,整个扩容过程中磁盘需要卸载操作,因此业务需要离线进行,扩容过程中需要删除分区,操作较危险,操作前务必做好快照避免误操作导致磁盘分区信息丢失。8. GPT新增磁盘分区对于需要多个磁盘分区的场景,可以在GPT磁盘上新建另外一个分区的方式实现,实现方式和新创建一个分区的过程相类似,如下为基于GPT格式磁盘新增分区的操作过程:
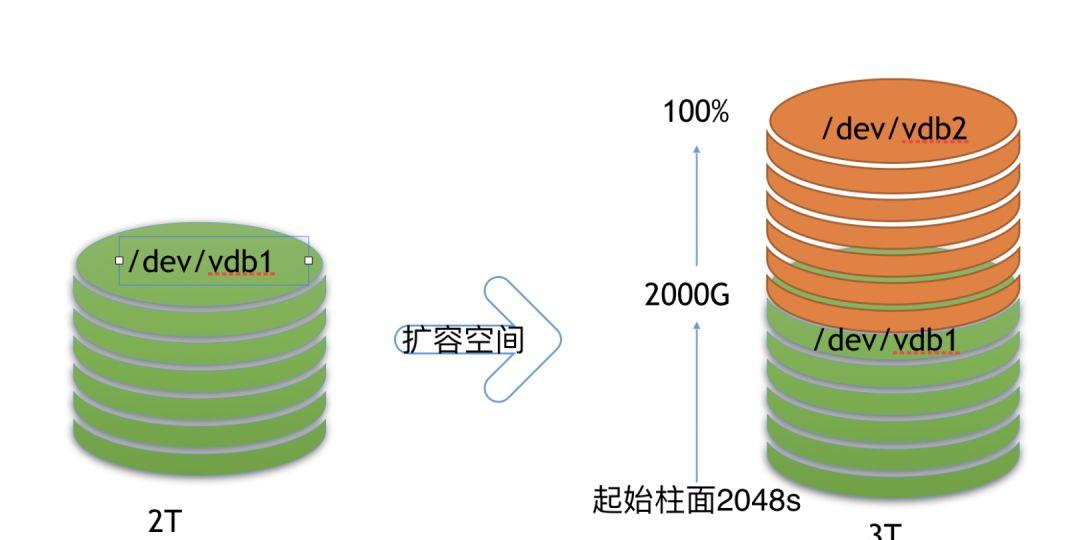 新增磁盘分区以磁盘扩容至3.5T为例,通过GPT格式新创建另外一个/dev/vdb2的分区,并挂载到系统中使用,如下演示操作过程:(1) 登录操作系统,确认磁盘空间扩容大小和磁盘格式为GPT。[root@VM_0_89_centos ~]# fdisk -l /dev/vdbWARNING: fdisk GPT support is currently new, and therefore in an experimental phase. Use at your own discretion.Disk /dev/vdb: 3758.1 GB, 3758096384000 bytes, 7340032000 sectors #磁盘空间大小为3.5TUnits = sectors of 1 * 512 = 512 bytesSector size (logical/physical): 512 bytes / 512 bytesI/O size (minimum/optimal): 512 bytes / 512 bytesDisk label type: gpt #磁盘分区格式类型为gptDisk identifier: 15BF58A1-BBE0-466A-B2C5-A243AD6A3108# Start End Size Type Name 1 2048 6291453951 3T Microsoft basic primary(2) 获取磁盘上一个分区的End范围,print得知结束范围3221GB ,下一个步骤需要使用到。[root@VM_0_89_centos ~]# parted /dev/vdb printError: The backup GPT table is not at the end of the disk, as it should be. This might mean that another operating system believes the disk is smaller. Fix, by moving the backup to the end(and removing the old backup)?Fix/Ignore/Cancel? FixWarning: Not all of the space available to /dev/vdb appears to be used, you can fix the GPT to use all of the space (an extra 1048576000 blocks) or continue with the current setting? Fix/Ignore? FixModel: Virtio Block Device (virtblk)Disk /dev/vdb: 3758GBSector size (logical/physical): 512B/512BPartition Table: gptDisk Flags: Number Start End Size File system Name Flags 1 1049kB 3221GB 3221GB xfs primary(3) 磁盘上新建一个分区/dev/vdb2,开始范围为上一个步骤中获取的磁盘大小。[root@VM_0_89_centos ~]# parted /dev/vdb mkpart primary 3221GB 100% #开始范围为步骤2获取的大小Information: You may need to update /etc/fstab.[root@VM_0_89_centos ~]# parted /dev/vdb printModel: Virtio Block Device (virtblk)Disk /dev/vdb: 3758GBSector size (logical/physical): 512B/512BPartition Table: gptDisk Flags: Number Start End Size File system Name Flags #包含有两个分区 1 1049kB 3221GB 3221GB xfs primary 2 3221GB 3758GB 537GB primary(4) 磁盘格式化创建文件系统,以制作xfs文件系统为例。[root@VM_0_89_centos ~]# mkfs.xfs /dev/vdb2meta-data=/dev/vdb2 isize=512 agcount=4, agsize=32768000 blks = sectsz=512 attr=2, projid32bit=1 = crc=1 finobt=0, sparse=0data = bsize=4096 blocks=131072000, imaxpct=25 = sunit=0 swidth=0 blksnaming =version 2 bsize=4096 ascii-ci=0 ftype=1log =internal log bsize=4096 blocks=64000, version=2 = sectsz=512 sunit=0 blks, lazy-count=1realtime =none extsz=4096 blocks=0, rtextents=0(5) 挂载磁盘分区到系统中,以手动mount为例演示,实际使用时应使用fstab实现持久挂载。[root@VM_0_89_centos ~]# mount /dev/vdb2 /data1/[root@VM_0_89_centos ~]# df -hFilesystem Size Used Avail Use% Mounted ondevtmpfs 485M 0 485M 0% /devtmpfs 496M 24K 496M 1% /dev/shmtmpfs 496M 484K 495M 1% /runtmpfs 496M 0 496M 0% /sys/fs/cgroup/dev/vda1 50G 1.9G 46G 4% /tmpfs 100M 0 100M 0% /run/user/0/dev/vdb1 3.0T 33M 3.0T 1% /data/dev/vdb2 500G 33M 500G 1% /data1 #已挂载完毕
三、总结
前文总结了在Linux环境中CBS三种使用方式:
裸设备创建文件系统;使用MBR格式分区;使用GPT格式分区。以及这三种使用方式对应的扩容方式和操作步骤。相比于裸设创建文件系统,使用MBR和GPT格式扩容时需要卸载磁盘,因此无法做到在线扩容。因此在云环境下推荐使用直接在裸设备上创建文件系统的方式,其更加便捷,易于实现,且扩容过程中可以在线扩容。
HappyLau,高级云计算顾问,目前在腾讯云从事公有云相关工作。曾就职于酷狗、EasyStack,拥有多年公有云 私有云云计算架构设计、运维、交付相关经验。参与过酷狗、南方电网、国泰君安等大型私有云平台建设,精通Linux、Kubernetes、OpenStack、Ceph等开源技术,具有丰富RHCA/OpenStack/Linux授课经验。
云加社区专栏:https://cloud.tencent.com/developer/column/79243。
参考文献:[1] 配套视频教程:https://cloud.tencent.com/edu/learning/course-1863-22287[2] MBR格式磁盘初始化:https://cloud.tencent.com/document/product/362/6734[3] GPT格式磁盘初始化:https://cloud.tencent.com/document/product/362/6735[4] Linux云服务器存储扩容:https://cloud.tencent.com/document/product/362/6738[5] Windows云服务器存储扩容:https://cloud.tencent.com/document/product/362/6737
推荐阅读

KonaJDK在腾讯大数据领域内的实践与发展